Indulge in the sweet sophistication of growing grapes, the vineyard treasures that embody the essence of summertime. Grapes are a great addition to any home garden and they just don’t get enough love!
I’m going to show you how to build a simple yet sturdy, grape vine trellis that will stand the test of time without breaking the bank. This espalier vineyard-style design uses posts and wire that help keep the grape plant orderly, making it healthier and easier to maintain. Once you know how to grow grapes and how to prune grape vines, you'll want to know how to properly trellis them.
Why I Love DIY Projects
We all want to grow green and save green, but organic gardening can be expensive. So, how can we grow organic produce and still save money?
That’s where DIY garden projects like this one come in! I love sharing money-saving DIY gardening hacks, such as how to build a cattle panel trellis, craft your own seed starting mix, inexpensively fill raised garden beds, make a DIY cucumber trellis, and make homemade compost to help your garden be not only agriculturally sustainable but also financially sustainable.
Importance of Trellising Grapes
Trellised vines can grow more grapes than untended ones. Let’s look at why trellising grapes is so important.
Benefit |
Description |
Promotes Airflow |
Improved air circulation is crucial for growing high-quality grapes! It will help prevent rust, powdery mildew and other forms of blight. |
Increased Sunlight Exposure |
Trellising allows more sunlight to reach the leaves and the fruit. Sunlight is essential for proper fruit development and ripening. |
Healthier Plants |
Keeping the leaves and fruit off the ground and providing good airflow will create a healthier vine and help prevent disease and fungal issues. |
Support the Vines |
A good trellis provides a sturdy structure for the grapevine to grow on. The last thing you want is for your nice full vine of grapes to come crashing down. |
Easier Pruning & Harvesting |
The best trellis designs help keep the plant orderly, making the parts more easily defined and identifiable when pruning. Harvesting is also much easier on a well-maintained vine growing off the ground. |
Maximize Fruit Production |
Correct grape vine pruning and trellising improve fruit quality and quantity by managing excessive foliage and directing the plant’s energy to fruit production. |
Best Type of Grape Trellis

To understand what makes the best grape vine trellis, you need to understand how grapevines grow. Grapevines have a main stem (or trunk) with leaders (or runs) growing outward along the height of it. Tendrils growing off the runs coil and wind around anything they can reach to hold the vine in place.
A good trellis has horizontal stainless steel wires ideally spaced about 1½ feet apart to support the main runs. This trellis design will help your grapevines get the sunlight and air circulation they need for a great harvest.
Another reason I really like wire trellis/wire supports (and why many people growing grapes professionally choose wire trellises) is because they keep the plant nice and orderly. You can also use a cattle panel trellis, an existing fence, a wooden lattice, or an arched trellis for grapes, but these tend to let the grapevine grow sprawling out in every direction. I use these other trellis designs for other vertical gardening applications besides grapes.
How to Build a DIY Grape Vine Trellis

Building your own grape vine trellis is a great way to have a professional-style trellis inexpensively.
Materials Needed

Using quality materials will allow your trellis to stand the test of time. Gather all your supplies before starting. Here's what you'll need:
Post Hole Digger - This long-handled hole-digging tool allows you to dig narrow deep holes perfect for setting posts.
Drill - A power drill makes for fast assembly.
Measuring Tape - You will need a measuring tape to measure the distance between posts, the hole depth, and the distance between trellis wires.
Galvanized Steel Wire - Use a heavy gauge wire that is strong enough to hold the heavy grapevines. I purchased “heavy picture frame stainless steel wire” from my local hardware store. Make sure you purchase one long length of wire to run the length of your trellis four times, plus about 8 extra feet.
Pencil - Grab a pencil or something similar to mark where to drill the posts for wires.
Washers - Use washers to ensure that the ferrules don’t slide right through the holes in the posts. You will need two of them.
Ferrules & Stops - You will need two ferrules and two stoppers.
Pliers or Vice Grips - You may want these to pull the wire tight through the ferrules.
Wire Cutters or Tin Snips - You’ll want wire cutters or tin snips to cut the steel wire to length.
4 x 4 Wooden Posts - I prefer using 8-foot tall pressure-treated posts. Each grapevine will require a 5-foot section of trellis, so two plants will require three posts, three plants will require four posts, four plants will require five posts, etc.
Step-by-Step Instructions for Trellis Construction
Building a grape vine trellis is a fun project. I've made it easy by breaking it down into steps.
Choose a Location - Pick a location for your trellis that gets full sun.
Measure and Mark Your Area - Starting at one end, mark the location of your first post and measure 5 feet to the next post, then 5 feet to the next post and so on for all the posts you plan to use (marking the location of the posts with a small stake or by placing an item on the ground there). Pro-Tip: You don’t want the posts too far apart because, as the grape vines grow, they will get heavy and put a lot of weight on the wires. A 5-foot post span gives the wires adequate support to keep them tight and properly supporting your grapes.
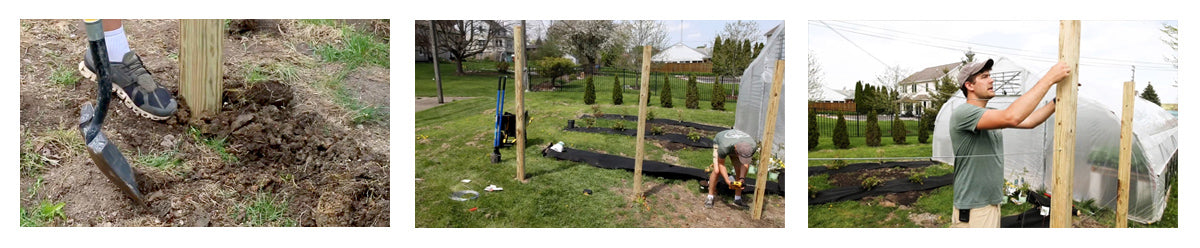
Dig Post Holes: Dig holes with the post hole digger at the location you marked for each post, making each hole about 1 ½ feet deep. Don’t bury the posts any shallower. The depth gives your trellis stability. Pro-Tip : Keep the depth of every hole consistent so that the finished height of your trellis will look uniform and follow the contour of the ground.
Install the Posts: Put your posts in the holes and double-check that you are burying them at the same depth (1 ½ feet)! Next, make sure the posts are vertically straight. Backfill the holes with soil, tamping the soil as you backfill around the posts to keep them secure. Pro-Tip: You may wonder if the holes should be filled with concrete instead of soil. You definitely can set the posts in concrete for further stability and permanence, but tamping the soil firmly will also work and save some costs.
Measure For Wire Placement - On each post, measure from the ground up 1 ½ feet where the first wire run should go. Place a mark there on the side of the posts that faces the other posts. Continue measuring and marking 1 ½ foot increments up the posts. Every post should have four marks where the four wire runs will go.
Drill Holes - Choose a drill bit slightly larger than the gauge of wire you have. Use your power drill to drill through the posts at each mark. The holes should go through the posts in the direction the wire will travel from one post to another.
Start the Wire - Starting at one end of the trellis, thread the wire through the bottom hole so that the end of the wire sticks out the end of the trellis.
Secure the End of the Wire - Put a washer on the end of the wire that is sticking out the end of the trellis. Then slip on the ferrule and then the stopper. Feed the wire back through the other end of the ferrule, being very careful not to fray the end of the wire! Grasp the wire on the inside of the trellis and pull the wire through the post and away from the ferrule you just added. Pull until it is tight, using pliers if needed.
Feed the Wire - Using the free end of the wire that now passes through the first post, thread it through the corresponding bottom hole on each post until it comes out of the last post at the other end of the trellis.
Move to the Next Run - Take the end of the wire coming out of the last post, pull it taut, and then thread it through the second drilled hole on that post to start the second run.
Continue Feeding the Wire Through - Pull the wire through all the corresponding second holes on the trellis in order, coming out of the end of the first post above where you started the wire. Pulling the wire taut, thread it through the third drilled hole on that post to start the third run. Feed the wire through all the third holes, out the end of the trellis, and then up to the fourth row of holes. Feed it through the fourth row of holes to create the fourth wire run.
Secure the Wire on the Last Post - The wire should be coming out of the end of the trellis in the top hole above where you secure the wire to start. Add a washer, ferrule, and stopper to the end of the wire. Feed the wire back through the other end of the ferrule, being very careful not to fray the end of the wire! Make sure all the wire runs are taut, and pull the wire through the ferrule tightly to secure it.
Cut the Wire - Cut off the excess wire sticking out the end.
Plant Your Grape Plants - Now you are ready to plant! This grower’s guide to grape cultivation will help you navigate choosing types of grapes, the correct way to plant, necessary soil amendments, and more.
*Update - I have modified my grape trellis design to include angular braces. If you will be growing a lot of grapes, please check out this video: Pro Grape Growing Tips, to learn more about angular braces.
Pruning Grape Vines on Your Trellis

Pruning your grape vines regularly removes dead parts and excess foliage, keeping the plant healthy and maximizing yields. If you don’t prune and maintain a grapevine, it will grow wild and chaotic.
When your grapes have grown through their first growing season, it’s time to read my complete guide on pruning grape vines correctly. It contains must-know, detailed information on pruning grape vines the right way (with a demonstrative video).
With a bit of effort, you can enjoy homegrown grapes for many years to come.


